What is SSO?
SSO stands for Single Sign-on, which is an authentication scheme that allows users to sign-in to multiple software systems with a single identity. This means that users can use just a single set of login credentials to log into multiple systems. Single Sign-On also makes your browsing and work much safer because you only have to log in just one time every time you want to access your applications.
Users who have to manage multiple accounts with different passwords at once tend to create much simpler passwords which can be more easily guessed or hacked. With SSO, you can focus on creating a single very strong password that can keep your apps and data safe. SSO works great with multi-factor authentication and helps you keep your accounts even safer from potential breach.
How does SSO work in LiveAgent?
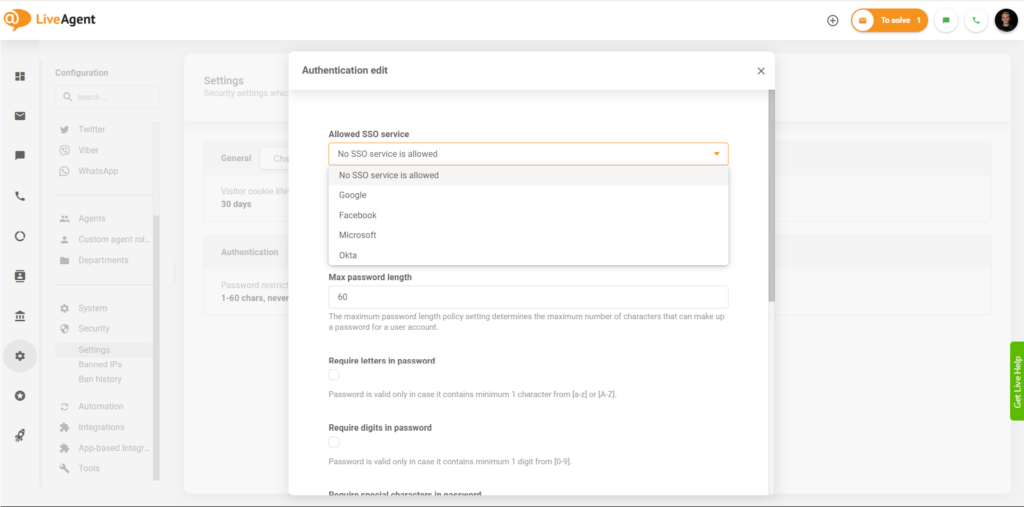
SSO in LiveAgent can be set up in the Configuration section. Currently you can access and set up SSO for your Microsoft, Google, and Facebook account or use SSO with the Okta provider. You can activate one provider. SSO does not create new users in the system, they still have to be manually created prior logging-in using SSO. For hosted LiveAgent accounts, the SSO for Google, Microsoft and Facebook accounts only needs to be turned on to function. Users of the standalone LiveAgent version need to set up identity providers manually.
Why should you start using SSO?
Setting up your Single Sign-On can help you with faster logins using your Microsoft, Google, Facebook, and Okta accounts. This type of SSO login can help you save more time while keeping your accounts safer in some regard. You can spend less time logging in and typing in your sensitive information into the system. Think of SSO as your master lock for all of your application accounts – it’s single but strong and can help you keep everything significantly safer. Combine it with Two Factor authentication for maximum security of your data.
How to set up SSO in your LiveAgent account?
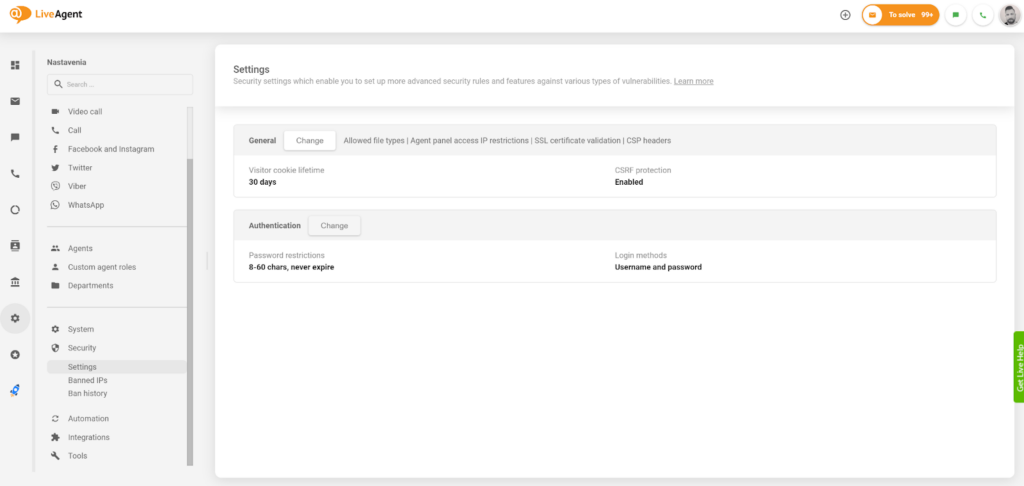
If you want to set up Single Sign-On in LiveAgent, follow these steps. First of all, go to your LiveAgent account and open Configuration. Go to Security and then Settings. You will see the Authentication option. Click on Change.

In the new window, you will see an option called Allowed SSO service. Click on it and select from three SSO options. You can choose between Google, Facebook and Microsoft. You can have only one SSO active at a time.

Interested in improving your help desk workflow? Take a look at the Single Sign-On options in LiveAgent and make sign ups easier for yourself today.
Say goodbye to the hassle of managing multiple login credentials with SSO!
In addition to the convenience of Single Sign-On (SSO), LiveAgent offers a range of features to help you streamline your support workflow, so you can deliver exceptional customer support from a unified platform.

 Български
  Čeština
  Dansk
Dansk  Deutsch
  Eesti
Eesti  Español
  Français
  Ελληνικα
  Hrvatski
  Italiano
  Latviešu
  Lietuviškai
  Magyar
  Nederlands
  Norsk bokmål
  Polski
  Română
  Русский
  Slovenčina
  Slovenščina
  简体中文
简体中文  Tagalog
  Tiếng Việt
  العربية
  Português


